Before we moved in, we decided to paint the kitchen. I quickly found out that my assumptions about painting were correct: I hated it! So i focused on some other projects and I came back a day later and L had magically transformed THIS…

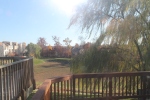
Out of the kitchen and into the living room
into THIS!

So I removed all of the hardware from the cabinets and cabinet doors (I only lost one screw in the process). I bought a fresh can of BIN Shellac Primer and a brand new Black & Decker random orbital sander and got to work!

 So there I was, on the floor of my basement with a bunch of paper unrolled and a bunch of sanded wood. I got my paint roller and my spray cans and i’m ready to go. Then I have this realization that I have NO CLUE WHAT I AM DOING!
Of course, me being the fly-by-the-seat-of-my-pants type, I just start painting!
I did take a quick break for a Monster energy drink though. I was briefly, highly addicted to them. I am trying to ween myself off of them now and am incurring daily caffeine headaches because of it though.
I sanded all of the grime, wood stain, and lacquer off of the cabinets to get down to the base wood. Our cabinets aren’t of the highest quality so I had to be careful about how I sanded. I didn’t want to chip anything. If you plan on doing this, I highly suggest that you buy a mask and goggles for sanding and possibly some ear plugs as it is really loud. I also would suggest the sanding sponges for the intricate crevices of the cabinet.
I used both a spray paint primer and a roller primer and I would suggest going with the spray paint if you can afford it! It was easier to get into the cracks and edges and whatnot with the spray paint and it was also quicker to apply and dry. The spray paint cans covered about 3 full cabinets (front and back) or 6 sides of a cabinet if you do all fronts at a time which is what I did.
I figured out that you had to move the paint can in a very smooth, even motion and I was doing this under my deck since I don’t have a garage. When it got windy, it was VERY difficult to get even coats. I would highly suggest doing it indoors if you have a well ventilated area and don’t mind getting paint dust on EVERYTHING.
Back to me! Once I got painting on the doors, I couldn’t stop! It was like I was possessed! Check out the process in the gallery below!
-

-
OOOOH!!!!!
-

-
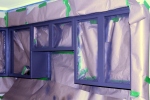
I believe this are the primed cabinets with the rollers. I primed them indoors with the roller.
-

-
More primed cabinets
-

-
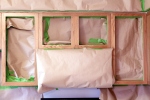
Here are the cabinets in the kitchen before I prepped the area and started painting.
-
-
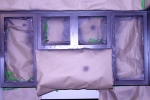
Here is a closeup of the taping and papering that was necessary to keep the paint off of the newly painted kitchen walls!
-

-
The prep work took me nearly 5 hours to do for the kitchen. I would definitely use plastic next time! Paper is difficult to work with in this tight spaces!
-

-
One full side of the cabinets all papered up and ready for spray time baby!
-
-
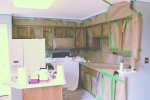
The entire kitchen. On the bottom right is the dish washer and the drop cloth covers the stove. The baby box is the microwave.
-

-
Spray time has begun! THis is after I painted the entire kitchen with two full coats.
-

-
Correction. I only sprayed this sucker with one coat. I figured it wouldn’t get much action and the first coat was a heavy (end of the day laziness) coat.
-
-
Here are the cabinets above the sink!
-

-
Notice how you can still see the wood grain. I thought about puttying them way, but the way it came out, I am glad that I didn’t.
-
-
Above the stove and microwave. As you can see, I was spraying like a skunk a heat!
After that was all said and done, I left for the night and returned a couple days later. I will take pictures tomorrow of the final product to share with you. BTW, I just want to say sorry for the terrible photos. I am not familiar with my camera at all yet and I am still trying to get used to the settings. I realized halfway through taking the pictures that I had it on some funky setting. I tried to alter the photos with my photo editing software, but I am an amateur at that as well.
Please, forgive G!


 Posted by G